

In this post, I’ll guide you through setting up a new Angular app and configuring it to use Azure AD authentication. This will be as much about the structure of the app itself as it will be about the security setup. The post consists of three main parts:
- Create the base application structure
- Configure and implement Azure AD authentication
- Call a secured Web API
I won’t be using any CSS/UI frameworks so the app itself will look pretty crude. But at the end of this post, you should have a solid barebones app to build upon. Spruce it up with some bootstrap/material/… and you’ll be golden.
Laying the foundations
First, let’s create a new Angular app. We will use the Angular CLI for this, so open up a command prompt and run the ‘ng new’ command.
ng new AdalSample
Now that we have our app, let’s open the folder with VS Code (or your editor of choice) and get going.
The basic structure
Let’s start by creating a new component called ‘main’. This will be the root component for the functional part of our application. It will contain the shared layout for the application (navigation, header, footer…).
ng g component Main
Open up the main.component.html and copy/past the snippet below. The most important part here is the ‘router-outlet’ tag. Our content will get injected after this tag.
<nav> <a [routerLink]="['/']">Home</a></nav><router-outlet></router-outlet>
Next is the home component. This will be the landing page for our application.
ng g component main/Home
Before moving on to the next part we also have to replace the content of app.component.html with a router-outlet tag.
<router-outlet></router-outlet>
Keeping order
When we open the app.module, we’ll see that the Angular CLI automatically adds new components to the declarations array. It also creates a separate import line for each component. We currently only have two components in larger applications, this can become quite a list. We can remedy this by using a barrel to group our components together.
Barrels are files with a fixed name (index.ts), that contain exports of other files. They are a great way to keep import statements to a minimum or to group imports (for example rxjs operator imports). So let’s create one in the app folder.
export * from './app.component';export * from './main/main.component';export * from './main/home/home.component';
Now we can import the barrel and have all our component imports on one line. While we’re in the app.module, let’s make sure the router module is imported. Otherwise our router-outlet won’t work.
import { Route, RouterModule } from '@angular/router';import * as c from './';@NgModule({ imports: [BrowserModule,RouterModule ], declarations: [c.AppComponent,c.MainComponent,c.HomeComponent ], providers: [], bootstrap: [c.AppComponent]})export class AppModule { }Routing
We still need to tell our application how to use our newly created components. Routing can be configured straight in the app.module, but we will be using a separate file to house our route configuration.
Create a new typescript file called ‘app.routing.ts’ in the app folder and paste the code below into it.
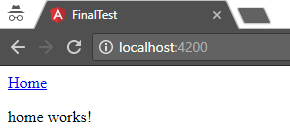
import { ModuleWithProviders } from '@angular/core';import { Route, RouterModule } from '@angular/router';import { MainComponent, HomeComponent } from './';const routes: Route[] = [{ path: '', component: MainComponent, children: [ { path: '', component: HomeComponent },]}];export const AppRoutes: ModuleWithProviders = RouterModule.forRoot(routes);Now all that’s left is adding the AppRoutes constant to the app.module imports. If we start the development server and navigate to localhost:4200, we’ll see the ‘home works!’ message.
Error pages
A good app needs to have error pages. So let’s start by creating a 404 page. I’m using a separate module for the error pages to make use of lazy loading.
ng g module ErrorPages
ng g component error-pages/NotFound
Just like in the app.module, we also have to define the routing for our new module. Create a new file called ‘error-pages.routing.ts’ and add the code below. Don’t forget to add the ErrorPagesRoutes to the error-pages.module imports.
import { ModuleWithProviders } from '@angular/core';import { Route, RouterModule } from '@angular/router';import * as c from './';const routes: Route[] = [{ path: '404', component: c.NotFoundComponent }];export const ErrorPagesRoutes: ModuleWithProviders = RouterModule.forChild(routes);For our 404 to work, we also need to add some routes to the app.routing file. The ** path in the last route is a wildcard that matches any route that isn’t defined.
const routes: Route[] = [{ path: 'error', loadChildren: 'app/error-pages/error-pages.module#ErrorPagesModule'},{ path: '', component: MainComponent, children: [ { path: '', component: HomeComponent },]},{ path: '**', pathMatch: 'full', redirectTo: 'error/404' }];If we go back to our website enter a non-existing URL in the address bar, our 404 page is shown. So far, so good.

Authentication
Authentication is done via the Azure Active Directory Authentication Library (ADAL) created by Microsoft. However, we won’t be using Microsoft’s ADAL.js directly, instead we’ll use an Angular wrapper library for ADAL. That way, we can skip over a lot of the boiler plate code. The one we’ll be using in this example is adal-angular4, so let’s go ahead and add the package to our solution.
npm i adal-angular4 --save
Once installation is complete, open up the app.module and add the imports below.
import { Http, HttpModule } from '@angular/http';import { Adal4Service, Adal4HTTPService } from 'adal-angular4';To allow the Adal4Service to be injected into our components, we need to add it to the providers array.
providers: [Adal4Service,{provide: Adal4HTTPService,useFactory: Adal4HTTPService.factory,deps: [Http, Adal4Service]} ],The Azure part
Now we need to make Azure aware of our app. Go to the Azure portal and select the Azure Active Directory blade. Under App Registrations, create a new App Registration.
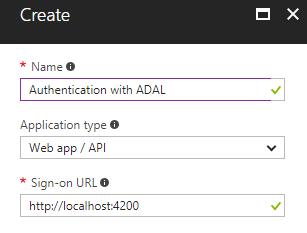
The name you enter here will be displayed on the login screen, so choose something friendly. For the remaining fields, select ‘Web app / API’ and enter the Angular development server URL.
Do not close the Azure portal just yet, we’ll come back to it in a minute.
Setting up ADAL
Back in our Angular project, it is now time to add our ADAL configuration to the environments file(s). The CLI creates two environment files by default. One for production (when building with the –prod switch) and one for everything else.
Open the environments.ts file and add an adalConfig entry as shown. The tenant value can be found in the Azure Active Directory blade under ‘Domain names’. For the clientId we need to go back to the App Registrations list. Open the registration we just created and copy the Application ID guid.
export const environment = { production: false, adalConfig: {tenant: 'my-tenant.onmicrosoft.com',clientId: '00000000-0000-0000-0000-000000000000'postLogoutRedirectUri: 'http://localhost:4200/logout' },};Now we’re ready to enable authentication for our app. Open the app.component and change it to the the following.
import { Component, OnInit } from '@angular/core';import { Adal4Service } from 'adal-angular4';import { environment } from '../environments/environment';@Component({ selector: 'app-root', templateUrl: './app.component.html', styleUrls: ['./app.component.css']})export class AppComponent implements OnInit { constructor(private adalSvc: Adal4Service) {this.adalSvc.init(environment.adalConfig); } ngOnInit(): void {this.adalSvc.handleWindowCallback(); }}The init call speaks for itself. It initializes the ADAL service using the settings in our environment file. The handleWindowCallback call will extract the bearer token from the URL when Azure returns to our application after sign-in.
At this point, we’ve fully configured the ADAL service, but when we run the application we won’t see any change just yet.
Login / Logout
It is now time to enable login for our application. For this purpose we will create two additional pages.
ng g component Login
ng g component Logout
The actual logging in is handled by Azure, I hear you think. So why do we need a login page in our application? Well, the name says it all. This is going to be the page where we will call the ADAL login function. Additionally it serves as a splash screen of sorts. So the user won’t see a flash of the actual application before being redirected to the Azure login page.
You’ll see I’ve also included the option to provide a return URL in the querystring. This will be used by our authentication guard. If we didn’t have this in place, the user would always end up on the home screen after logging in.
import { Component, OnInit } from '@angular/core';import { ActivatedRoute, Router } from '@angular/router';import { Adal4Service } from 'adal-angular4';@Component({ selector: 'app-login', templateUrl: './login.component.html', styleUrls: ['./login.component.css']})export class LoginComponent implements OnInit { constructor(private route: ActivatedRoute,private router: Router,private adalSvc: Adal4Service ) { } ngOnInit() {const returnUrl = this.route.snapshot.queryParams['returnUrl'] || '/';if (this.adalSvc.userInfo.authenticated) { this.router.navigate([returnUrl]);} else { this.adalSvc.login();} }}Next is the logout page. When the user clicks the logout link, this will be the place they’re sent. This will also be the page Azure redirects to after logging out. We set the redirect using the ‘postLogoutRedirectUri’ property in the Adal configuration.
As you can see in the code, the only thing that happens here is the logout call. Like with the login page, a reason for keeping this in a separate component is to have a splash screen to show between the time the user clicks logout, and the redirect to Azure.
import { Component, OnInit } from '@angular/core';import { Adal4Service } from 'adal-angular4';@Component({ selector: 'app-logout', templateUrl: './logout.component.html', styleUrls: ['./logout.component.css']})export class LogoutComponent implements OnInit { isAuthenticated = false; constructor(private adalSvc: Adal4Service ) {this.isAuthenticated = this.adalSvc.userInfo.authenticated; } ngOnInit() {if (this.isAuthenticated) { this.adalSvc.logOut();} }}In the markup we set different messages to show based on the status of the user (authenticated or not).
Signing out... Signed out successfully. Click <a [routerLink]="['/login']">here</a> to log back in.
To test the logout page, we also have to add a logout link to our main.component.
<nav> <a [routerLink]="['/']">Home</a> <a [routerLink]="['/logout']">Logout</a></nav><router-outlet></router-outlet>
And before moving on, we still need to clean up some things. As usual, the CLI has already added our new components to the app.module. But we’re using a barrel, remember?
So first add the new components to our barrel in the app folder and correct the declarations in the module. The now unused imports can be removed.
export * from './app.component';export * from './login/login.component';export * from './logout/logout.component';export * from './main/main.component';export * from './main/home/home.component';
declarations: [c.AppComponent,c.MainComponent,c.HomeComponent,c.LoginComponent,c.LogoutComponent ],
Securing content
We’ve done a lot of setup work up to this point. But, this is where we will actually see everything come together.
To secure our main component and everything below it, we’re going to use a guard. This is nothing more than a class that implements some interfaces. Angular provides four interfaces for protecting routes.
For our app, we will only use CanActivate and CanActivateChild. If you want a more in depth explanation, Pascal Precht has a very nice post on guards.
First, let’s create a new folder called ‘common’ with a subfolder ‘guards’. In the guards folder, we create a new file called ‘authentication-guard.ts’ with the following content.
import { Injectable } from '@angular/core';import { Router, CanActivate, CanActivateChild, ActivatedRouteSnapshot, RouterStateSnapshot } from '@angular/router';import { Adal4Service } from 'adal-angular4';@Injectable()export class AuthenticationGuard implements CanActivate, CanActivateChild { constructor(private router: Router,private adalSvc: Adal4Service ) { } canActivate(route: ActivatedRouteSnapshot, state: RouterStateSnapshot): boolean {if (this.adalSvc.userInfo.authenticated) { return true;} else { this.router.navigate(['/login'], { queryParams: { returnUrl: state.url } }); return false;} } canActivateChild(childRoute: ActivatedRouteSnapshot, state: RouterStateSnapshot): boolean {return this.canActivate(childRoute, state); }}When any of the CanActivate methods get called, our guard checks whether the user is logged in. If the user needs to login, it will redirect to our login page with the current route’s URL in the querystring.
For all this to work, we still need to do two things. Add our guard to the providers array in our app.module and register it on some routes.
providers: [Adal4Service,{provide: Adal4HTTPService,useFactory: Adal4HTTPService.factory,deps: [Http, Adal4Service]},AuthenticationGuard ],const routes: Route[] = [{ path: 'error', loadChildren: 'app/error-pages/error-pages.module#ErrorPagesModule'},{ path: 'login', component: LoginComponent },{ path: 'logout', component: LogoutComponent },{ path: '', component: MainComponent, canActivate: [AuthenticationGuard], canActivateChild: [AuthenticationGuard], children: [ { path: '', component: HomeComponent },]},{ path: '**', pathMatch: 'full', redirectTo: 'error/404' }];Our guard will get called when the user navigates to the main component or one of it’s child routes.
When running the application, you will see that the functional part of our application now requires authentication, while things like the error pages, login and logout are reachable without logging in.
Getting data
Now that we’ve secured our application, it is time to get some data. For that purpose, I have a secure WebAPI hosted in Azure that returns some hard-coded employee data. I won’t go into detail on how to set up a WebAPI since it not in the scope of this post. Koen has written an excellent post on how to do this.
The setup
To make use of Angular’s lazy loading, we will create a new module to group everything employee related. Organising your application into functional blocks like this has the added benefit of having components, services and models in close proximity.
First we’re going to create the module, the list component and the service class.
ng g module main/Employee
ng g component main/employee/List
ng g service main/employee/Employee
Next is our employee model. Add a folder ‘models’ in the employee folder and create a new file called ’employee.ts’. Copy the snippet below and save.
export interface IEmployee { id: number; name: string; function: string;}export class Employee implements IEmployee { id: number; name: string; function: string; constructor(obj?: IEmployee) {if (obj) { Object.assign(this, obj);} }}Normally I would also create barrels in the ’employee’ and ‘models’ folders. But since this example won’t get any extra functionality, we will skip the barrels.
Create a file called ’employee.routing.ts’ And add the route to the list component.
import { ModuleWithProviders } from '@angular/core';import { Route, RouterModule } from '@angular/router';import { ListComponent } from './list/list.component';const routes: Route[] = [{ path: '', component: ListComponent }];export const EmployeeRoutes: ModuleWithProviders = RouterModule.forChild(routes);We still need to link everything up, so open up the employee module and add the EmployeeRoutes and EmployeeService.
import { NgModule } from '@angular/core';import { CommonModule } from '@angular/common';import { EmployeeRoutes } from './employee.routing';import { EmployeeService } from './employee.service';import { ListComponent } from './list/list.component';@NgModule({ imports: [CommonModule,EmployeeRoutes ], declarations: [ListComponent ], providers: [EmployeeService ]})export class EmployeeModule { }And lastly, add a link to our employee list and that’s it for the setup.
<nav> <a [routerLink]="['/']">Home</a> <a [routerLink]="['/employee']">Employees</a> <a [routerLink]="['/logout']">Logout</a></nav><router-outlet></router-outlet>
The implementation
For the service implementation, we have it pretty easy. Adal-angular4 will do almost everything for us. But first we need to make Adal aware of our api and that requires we make some changes in our environments file.
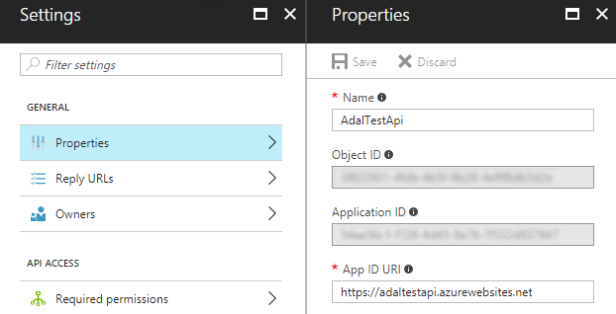
export const environment = { production: false, adalConfig: {tenant: 'my-tenant.onmicrosoft.com',clientId: '00000000-0000-0000-0000-000000000000'postLogoutRedirectUri: 'http://localhost:4200/logout',endpoints: { 'https://adaltestapi.azurewebsites.net': 'https://adaltestapi.azurewebsites.net'}, }, apiUrl: 'https://adaltestapi.azurewebsites.net/api/'};The ‘apiUrl’ is for use in our service and it contains the base URL of our WebAPI. For service authentication to work correctly, we also need to add our API to the endpoints in our Adal configuration. The endpoints value is an object with key/value pairs for each resource the application uses. The key is the resource URL and the value is the App ID URI. You can find this value in the Azure portal under the app registration settings of your API.
Now on to the service itself. We do essentially the same as we normally do, but instead of Angular’s Http, we use the Adal4HTTPService. This wrapper works virtually the same as Http, but it will automatically add the bearer token to the request. But only if the request URL is defined as an endpoint.
import { Adal4HTTPService } from 'adal-angular4';import { environment } from '../../../environments/environment';import { Employee, IEmployee } from './models';@Injectable()export class EmployeeService {constructor(private http: Adal4HTTPService ) { } public getEmployees(): Observable<Array<IEmployee>> {return this.http.get(`${environment.apiUrl}Employee`) .map(response => {const tmp = <IEmployee[]>response.json();return tmp.map(e => new Employee(e)); }); }}All that is left, is to call our service and show the data on screen. This is exactly the same as you’re used to.
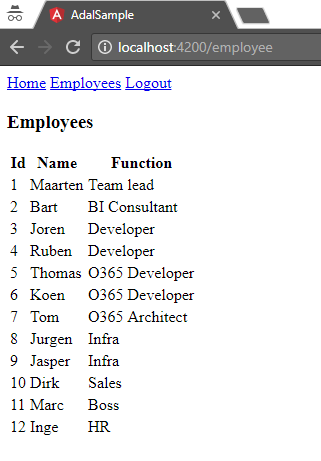
export class ListComponent implements OnInit { employeeList: Array<IEmployee> = []; constructor(private empSvc: EmployeeService ) { } ngOnInit() {this.empSvc.getEmployees().subscribe( rslt => this.employeeList = rslt, error => console.log(error)); }}<h3>Employees</h3><table><thead><tr><th>Id</th><th>Name</th><th>Function</th></tr></thead><tbody><tr *ngFor="let emp of employeeList"><td>{{emp.id}}</td><td>{{emp.name}}</td><td>{{emp.function}}</td></tr></tbody></table>Conclusion
And that is it. Using Adal with Angular is pretty easy when using a wrapper like adal-angular4. But as I said in the intro, this post is mostly about providing a decent starting structure for the types of business apps a lot of us typically work on. The biggest advantage I find, is that authentication code is centralised. None of the components under main have to know anything about Adal, Azure or security. All this is handled far away from the business and UI logic, which makes for an easier to maintain application.
The source code of the sample projects can be found on our GitHub.

Joren Paps
Senior Developer @ Spikes
![]()
![]()

Thanks for this example, I will try this at home!
LikeLike
Excellent tutorial.
What changes we have to make in order to call web api at localhost? Change into endpoints and apiUrl to localhost doesn’t works.
LikeLiked by 1 person
I’ve been using this library and when I call our API the token checking restarts the angular app (iframe?) which is causing problems – any idea how to avoid the page/iframe redirect or do it in the background? thanks
LikeLike
This adal_angular4 library does not renew token with acquiretoken it always fails with token timeout error msg. Do you know whats causing that? I tried everything online still no result. I was able to get token with ng2-adal but even with that now there are problems.
LikeLike
What about a bookmarked page? Would this force the user to login first and then redirect them to their page?
LikeLike