

Every SharePoint developer has probably done it: create a web service to access SharePoint data from a provider-hosted add-in and allow the web service to make app-only calls to SharePoint using an AppOnly access token. You forget that the web service doesn’t require any authorization, and doing so, people from outside your organisation – who know the existence of your web service – will be able to access your SharePoint data as well, because by default there isn’t any authorization required to use the web service. You should never forget to only allow authenticated users by enabling Azure Active Directory Authentication for your web service!
In this blogpost I will show you how you can access your SharePoint data in a secure way, without using the AppOnly token. I will not even create a SharePoint add-in.
The three main components that will be used in this demo are:
– Azure AD application
– Azure web app to host your web service
– SharePoint online
Basicaly this means you will need to be global administrator on Azure to complete all of the steps.
Build your Web API in Visual Studio
Create a Visual Studio project
Open Visual Studio and create a new ASP.NET Web Application
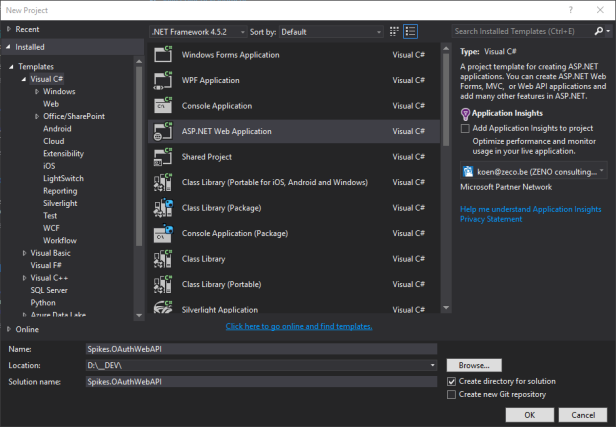
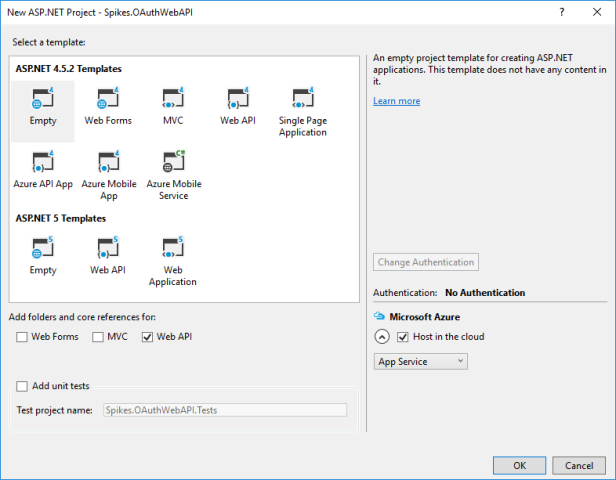
Create an empty project. I opted to add folders and references for Web API and to host the web app in the cloud.
Because I selected to host the app in the cloud in the previous step, I can create the app service that will host the API from the same wizard.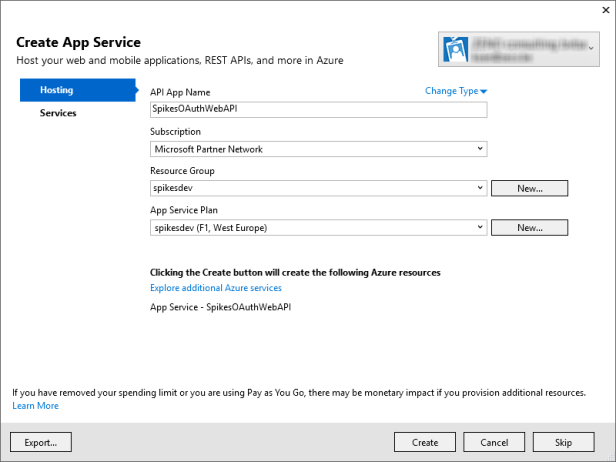
Click Create.
Add NuGet packages
We will start to add some NuGet packages to the backend web project. Click Tools > NuGet Package Manager > Package Manager Console. Install the following packages:
Install-Package Microsoft.AspNet.WebApiInstall-Package Microsoft.AspNet.WebApi.OwinInstall-Package Microsoft.Owin.Host.SystemWebInstall-Package Microsoft.Owin.Security.ActiveDirectoryInstall-Package Microsoft.IdentityModel.Clients.ActiveDirectory -Version 2.15.204151539Install-Package SharePointPnPCoreOnline
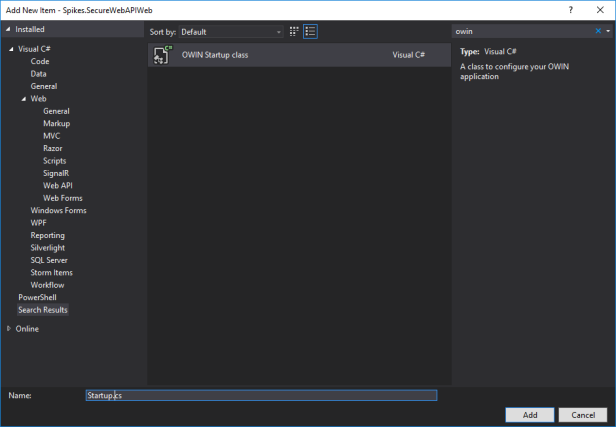
Add Owin Startup Class
We will start by telling the Owin Framework what class is responsible for the Owin initialization.
Add a new item of type OWIN Startup class to the backend web project.
Add the following code snippet to the Startup class
[assembly: OwinStartup(typeof(Spikes.SecureWebAPIWeb.Startup))]namespace Spikes.OAuthWebAPI{public partial class Startup{public void Configuration(IAppBuilder app){ConfigureAuth(app);HttpConfiguration config = new HttpConfiguration();WebApiConfig.Register(config);app.UseWebApi(config);var jsonFormatter = config.Formatters.OfType<JsonMediaTypeFormatter>().First();jsonFormatter.SerializerSettings.ContractResolver = new CamelCasePropertyNamesContractResolver();}public void ConfigureAuth(IAppBuilder app){app.UseWindowsAzureActiveDirectoryBearerAuthentication(new WindowsAzureActiveDirectoryBearerAuthenticationOptions{Tenant = ConfigurationManager.AppSettings["ida:Tenant"],TokenValidationParameters = new TokenValidationParameters{ValidAudience = ConfigurationManager.AppSettings["ida:Audience"]},});}}}Update WebApiConfig Class
Open the class WebApiConfig located in the App_Start folder and update with the folowing code.
public static class WebApiConfig{public static void Register(HttpConfiguration config){config.MapHttpAttributeRoutes();config.EnableCors();config.Routes.MapHttpRoute(name: "DefaultApi",routeTemplate: "api/{controller}/{id}",defaults: new { id = RouteParameter.Optional });config.Formatters.JsonFormatter.SupportedMediaTypes.Add(new MediaTypeHeaderValue("text/html"));}}Add a Controller to Handle Requests
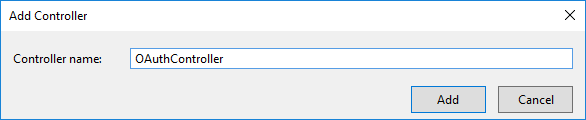
Create a new Folder named Controllers. Add a new Web API 2 Controller.
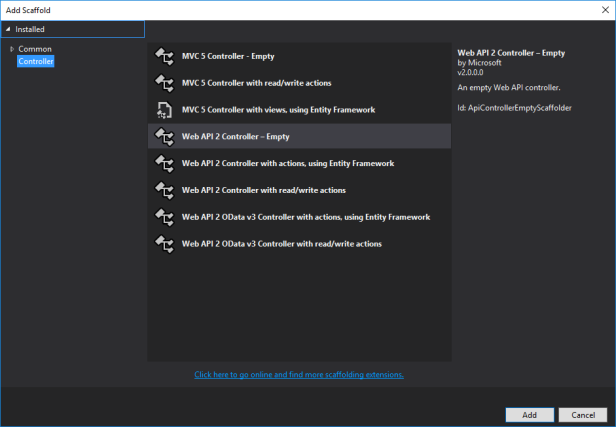
Give it a name.
Add the following code to it. The Authorize attribute will make sure that only authorized calls are allowed to access the controller. The GetSharePointAccessToken will get a new token to access SharePoint Online and get the sites’s web title.
[Authorize][RoutePrefix("api/v1/oauth")]public class OAuthController : ApiController{[HttpGet][Route("getwebtitle")]public string GetWebTitle(string sharePointUrl){string accessToken = GetSharePointAccessToken(sharePointUrl, this.Request.Headers.Authorization.Parameter);using (var context = TokenHelper.GetClientContextWithAccessToken(sharePointUrl, accessToken)){Web web = context.Web;context.Load(web);context.ExecuteQuery();return web.Title;}}internal static string GetSharePointAccessToken(string url, string accessToken){string clientID = ConfigurationManager.AppSettings["ida:ClientID"];string clientSecret = ConfigurationManager.AppSettings["ida:ClientSecret"];var appCred = new ClientCredential(clientID, clientSecret);var authContext = new AuthenticationContext("https://login.windows.net/common");AuthenticationResult authResult = authContext.AcquireToken(new Uri(url).GetLeftPart(UriPartial.Authority), appCred, new UserAssertion(accessToken));return authResult.AccessToken;}}Configure your Azure web app
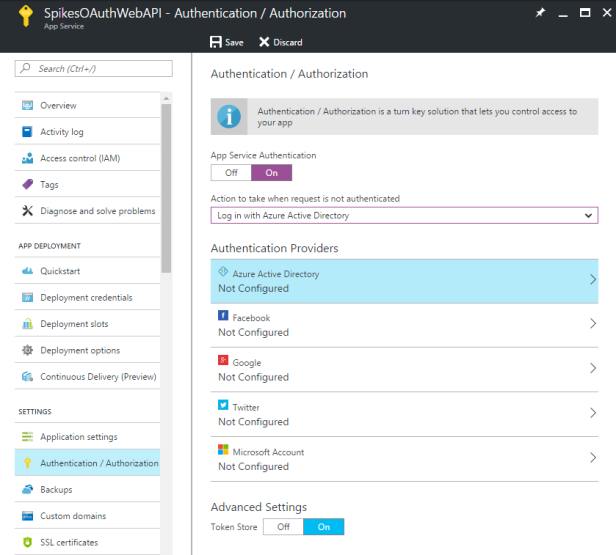
Log on to your Azure portal and go to the web application you have created earlier. First of all, we will make sure that this web app can only be accessed by athenticated users.
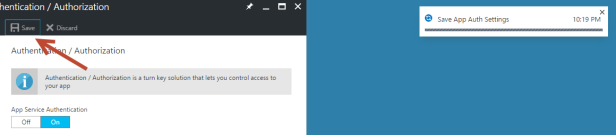
Authentication / Authorization
Open your web app and go to Authentication / Authorizatio settings. Turn on App Service Authentication and select Azure AD as authentication provider.
Choose Express settings > Create New AD App. 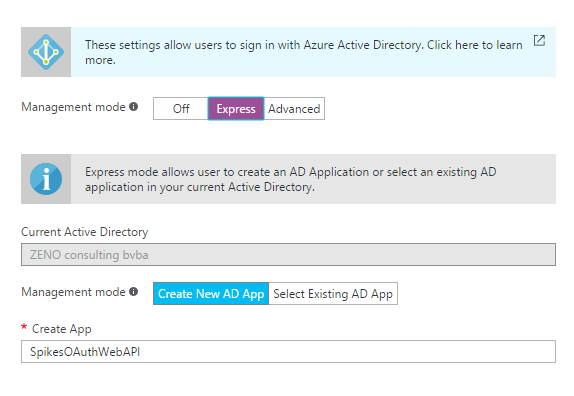
After you have clicked Ok, you should save your settings! An Azure AD Application will be created in the background.
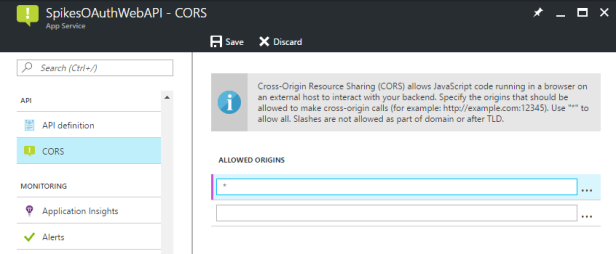
CORS settings
To make sure we can access our web API, we also have to update the CORS settings. More information about CORS can be found here. I have allowed all origins here, but of course in real life, you also want to restrict that.
Configure your Azure AD Application
The Azure AD application has been created in the background for us, but still we need to update some settings and grab some information from it to make our solution work.
OAuth 2.0 Authorization Code Grant Flow
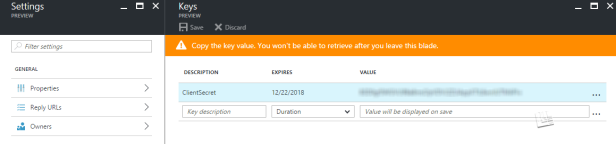
Your first step is to generate a client secret (key) in the configuration page of your Azure AD application. Be aware that once your client secret is generated, you will not be able to see it again – so store it safely once you get it. We will need this later.
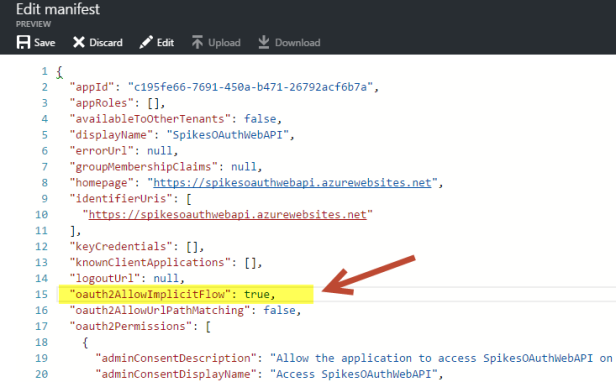
OAuth 2.0 Implicit Grant Flow
If you’re building a SPA web app you may be in need of the implicit grant flow, as you’ll perform most of your computing on the client-side. Before you can use the implicit grant flow with your Azure AD application – you will need to enable it in your Azure AD application. Go to the manifest of your application and update the setting oauth2AllowImplicitFlow from false to true.
Reply Urls
We also need to update the Reply URLs. Add the url(s) from where you will call the web API. If the location is not listed here, you will get an error when trying to access it. You can also see this as some kind of security.

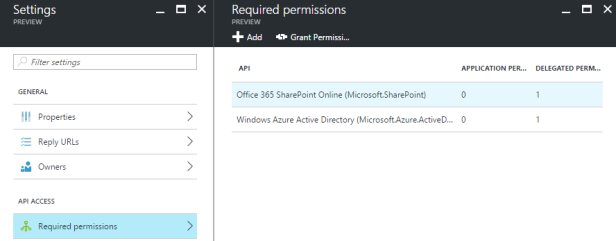
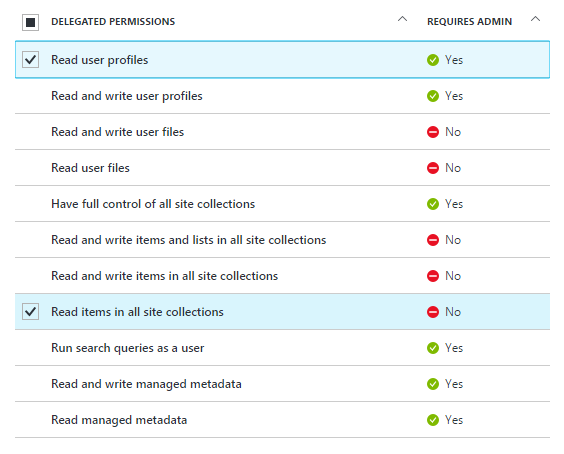
Permissions
Here we will set the permissions our application will need. If you want to act on behalf of a user, you should pick delegated permissions. In this example we will as the Office 365 SharePoint Online API.
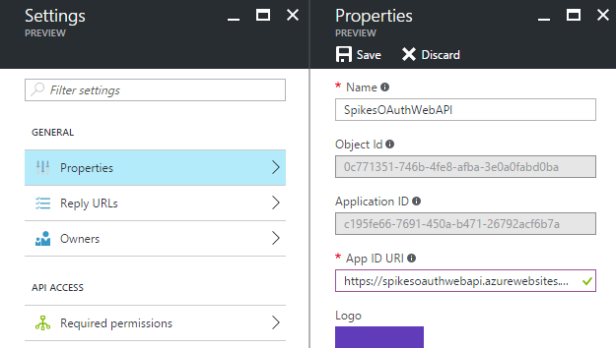
Properties
Now everything is set up, we will need to grab some parameters. We will need those later add them to the web.config of our web application and to our javascript that will call the web API.
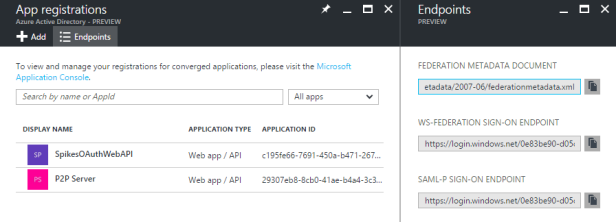
- TenantId: you can find in the endpoints section. Take any of the endpoints urls. The guid in there corresponds to your tenant ID
- ClientId: the Application ID, found in the properties page of your application
- Audience: the App ID URI, found in the properties page of your application
Consent
One last step to start using our API, is provide and admin consent to our application. Update the following url with the parameters of your own application and paste it in your browser.
Log in with your admin account. You will be redirected to a content page which provides you an overview of permissions you have granted to your application. Click Accept.
Note that every time, you make changes to the permissions, you need to regrant the application consent.

Configure & publish the web app
Now that everything is set up, we Open the web.config of the web app and add the following parameters:

We are ready to publish our web app to Azure!
Let’s test!
To test the web API, I have created a simple HTML page with a button that will call the web API. The result is printed to the console.
I have added a content editor web part to a SharePoint site in my tenant and referenced this html file.
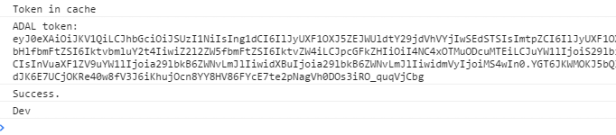
<!DOCTYPE html><html><body><h1>OAuth Web API test page</h1><input type="button" id="button" name="button" value="Click me" /><script src="https://ajax.googleapis.com/ajax/libs/jquery/1.11.1/jquery.min.js"></script><script src="https://secure.aadcdn.microsoftonline-p.com/lib/1.0.0/js/adal.min.js"></script><script type="text/javascript"> $("#button").click(function(){var webTitle = GetTitle(); }); "use strict"; window.config = {instance: 'https://login.microsoftonline.com/',tenant: '' // Update with your tenant ID,clientId: '' // Update with your application ID,postLogoutRedirectUri: window.location.origin,endpoints: { endPointApiUri: 'https://spikesoauthwebapi.azurewebsites.net' // Update with your azure web url},cacheLocation: 'localStorage' // enable this for IE, as sessionStorage does not work for localhost. }; function GetTitle() {var authContext = new AuthenticationContext(config);// Check For & Handle Redirect From AAD After Loginvar isCallback = authContext.isCallback(window.location.hash);authContext.handleWindowCallback();if (isCallback && !authContext.getLoginError()) { window.location = authContext._getItem(authContext.CONSTANTS.STORAGE.LOGIN_REQUEST);}// If not logged in force loginvar user = authContext.getCachedUser();if (user) { // Logged in already}else { // NOTE: you may want to render the page for anonymous users and render // a login button which runs the login function upon click. authContext.login();}authContext.acquireToken(authContext.config.clientId, function (error, token) { if (error || !token) { console.log("ADAL error occurred: " + error); return; } console.log("ADAL token: " + token); var uri = config.endpoints.endPointApiUri + "/api/v1/oauth/getwebtitle"; $.ajax({ type: "GET", url: uri, data: { "sharePointUrl": "" // Update with a SharePoint Url in your tenant }, headers: { 'Accept': 'application/json', "Authorization": "Bearer " + token } }).done(function (response) {console.log("Success."); console.log(response); return response; }).fail(function () { console.log("Failed."); });}); }</script></body></html>Check the browser console – you will find the token and the name of the site!
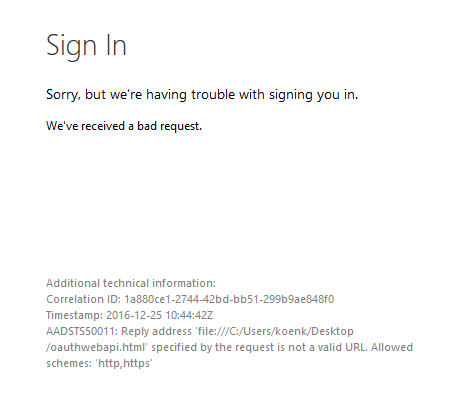
Now what will happen if we open the same html file from a location that is not defined in our Azure AD application? Outside the SharePoint context?
You will be redirected to the Microsoft online sign in page where you are asked for your credentials. So far, so good.

But you will get an error message because the reply address is not a valid URL..
Sources:
The following source code on PnP was very big help while testing Azure Active Directory Authentication and writing this blog: https://github.com/SharePoint/PnP/tree/master/Samples/AzureAD.WebAPI.SPOnline

Koen Koninckx
O365 Developer @ Spikes
![]()
![]()

Really trttwsoruhy blog. Please keep updating with great posts like this one. I have booked marked your site and am about to email it to a few friends of mine that I know would enjoy reading..
LikeLike
great issues altogether, you just won a new reader.
What might you suggest about your post that you made a few days
in the past? Any sure?
LikeLike
I read this paragraph fully regarding the resemblance
of most recent and earlier technologies, it’s amazing article.
LikeLike