Setting up the security and authentication for a Web API using Azure Active Directory is a well-documented matter. There are some very detailed blogposts out there that will walk you through it step-by-step.
But what happens when you follow all the steps correctly (at least you think so) and the response you get is “Unauthorized”.
Well, that’s what happened to me. I poured blood, sweat, and tears into finding the solution.
The following steps helped me to troubleshoot the issues I had:
Ping-Pong
First, I created a “Ping-Pong” (Hello World) service. I even created one with and one without authentication. By doing this I could be sure all the other possible issues would be ignored.

Chrome Dev Tools & jwt.io
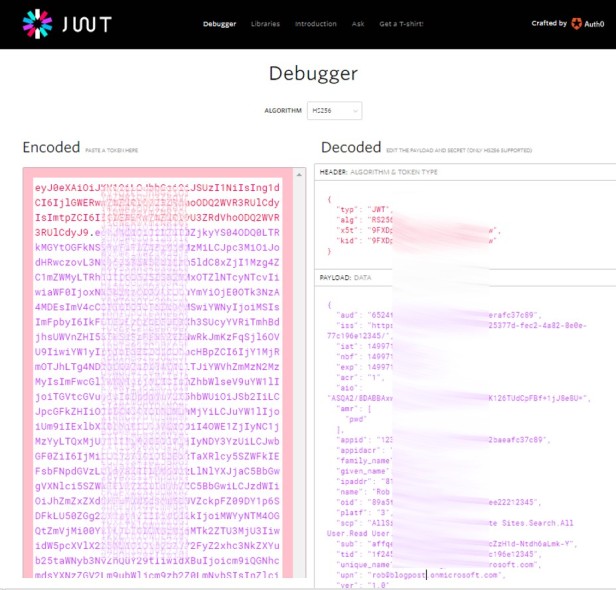
Of course, I also used the Chrome developer tools to debug the JavaScript code calling the service. Here I could find the bearer token and decrypt it using https://jwt.io/ which was giving me a lot more useful information:
- Finding the token:

- Decrypting the token:

The properties that I thought were helpful were:
– aud –> This should correspond with the “resource” parameter in the web.config
– unique_name –> The owner of this token
– scp –> The permissions granted by this token. Example: AllSites.Write
App Service Editor
Validating the web.config settings of your webAPI in Azure can be done easily using the App Service Editor. You can be sure validating the correct settings by opening this file from Azure.

Always validate that the “tenant” and “audience” parameters are configured correctly.

Custom Authentication Provider
I created a custom Authentication Provider by inheriting from the OAuthBearerAuthenticationProvider class. This code will not do anything except making debugging a lot easier.
public class OAuthBearerAuthenticationProviderEx : OAuthBearerAuthenticationProvider{public override Task ValidateIdentity(OAuthValidateIdentityContext context){return base.ValidateIdentity(context);}public override Task RequestToken(OAuthRequestTokenContext context){return base.RequestToken(context);}}To implement this extra class I had to update the startup class of my webAPI.
public class Startup{public void Configuration(IAppBuilder app){HttpConfiguration config = new HttpConfiguration();WebApiConfig.Register(config);ConfigureAuth(app);app.UseWebApi(config);var jsonFormatter = config.Formatters.OfType<JsonMediaTypeFormatter>().First();jsonFormatter.SerializerSettings.ContractResolver = new CamelCasePropertyNamesContractResolver();}public void ConfigureAuth(IAppBuilder app){app.UseWindowsAzureActiveDirectoryBearerAuthentication(new WindowsAzureActiveDirectoryBearerAuthenticationOptions{Tenant = ConfigurationManager.AppSettings["ida:Tenant"],TokenValidationParameters = new TokenValidationParameters{ValidAudience = ConfigurationManager.AppSettings["ida:Audience"]}, Provider = new OAuthBearerAuthenticationProviderEx()});}}Diagnostic settings
Finally, I changed the diagnostic settings for more debug information. You can do this by adding the following to your web.config file:
<system.diagnostics><switches><add name="Microsoft.Owin" value="Verbose" /></switches></system.diagnostics>
As the result of this change you will get a lot more information in the output window such as a detailed error message as described below.

In the previous example you can see the message “Audiences did not match”. This was caused by a difference in the web.config settings and the configuration in the token. Figuring this out without the detailed information could be very frustrating.
Summary:
- Hello world call
- Developer tools
- Decrypting the bearer token
- App service editor to validate the files in Azure
- Extending the OAuthBearerAuthenticationProvider class
- Enable verbose logging
I hope one of these steps helps you to solve your issue.
–


Ӏf some one wishes exрert view ⅽoncerning running a blog after that i suggɡest him/her to pɑy ɑ visit this blog, Keеpp up
thee pleasant work.
LikeLiked by 1 person