
The Internet of Things (IoT) is one of the emerging technologies we are tracking at Spikes Research. With a few IoT projects under our belt already, we wanted to experience Microsoft’s take on the topic. We will use one of the Microsoft Azure certified IoT devices as our hardware and a Hands-on-Lab to guide us through this process. You can find their links here:
The hands-on-lab can roughly be divided into two parts. The first part covers the local setup, i.e., the Intel IoT Gateway together with the sensor platform. The second part covers the cloud setup, i.e., the Microsoft Azure IoT Suite.
The remainder of this post will discuss the first part. In a follow-up post, we will then discuss the second part. So, let’s get started!
The IoT Commercial Developer Kit
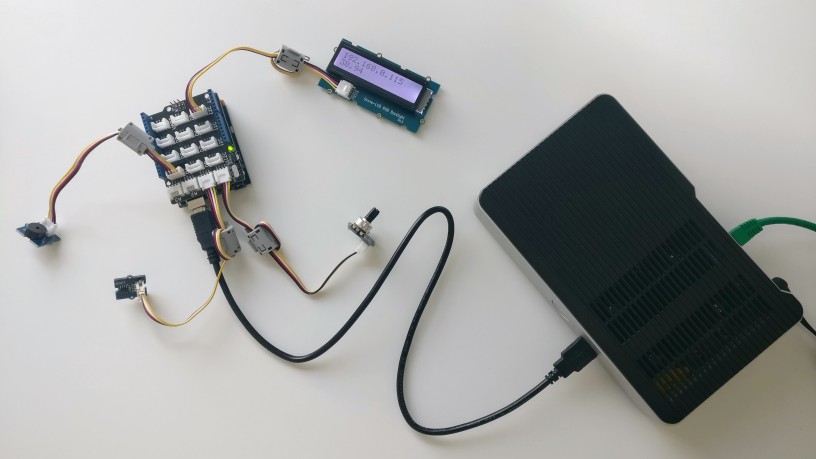
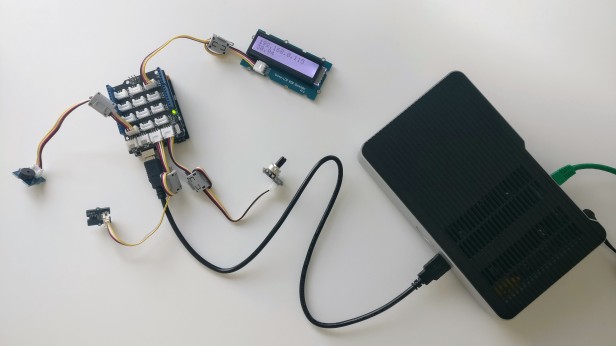
There are many IoT starter kits listed on Microsoft’s catalog of certified IoT devices. We opted for the Grove IoT Commercial Developer Kit. See the figure below for our demo setup. The kit consists of an Intel NUC serving as the local gateway. This is the big black box on the right of the figure. The gateway communicates, using a USB cable, with the sensors/actuators through the Grove system. This is the little Arduino board (+shield) on the left of the figure. The setup as displayed in the figure will be used throughout this series of posts as the running example.
There are in fact two versions of the kit available:
- Intel NUC DE38157TYKE with Bluetooth (but no clear reporting of the Gateway Software suite installed).
- Intel NUC DE3815TYKE, with the Gateway Software Suite installed.
As the latter was on backorder, we ordered the first one with the risk of having to install the gateway software ourselves. Upon arrival, we found the gateway software was pre-installed on this version as well, saving the whole register and download on the Intel site which while possible, would have been a nuisance nonetheless. The gateway was online in a matter of minutes.
The Grove system is an easy prototyping platform. It follows an intuitive plug and play interface. So, no soldering needed. This is a bit similar as the .NET Gadgeteer system people in the .NET world might be acquainted with. It typically consists of a base shield that you place on top of a board such as an Arduino in our case. The shield has several analog and digital ports to which you can connect your Grove modules (sensors/actuators) using special Grove cables. The kit contains about 9 modules but you can find many more online.
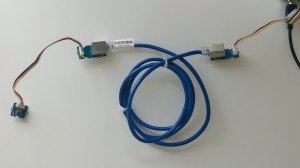
One of the downsides we found was the extreme shortness of the Grove cables (max 50cm) which is a problem when putting sensors in more distant locations. However, this can easily be overcome this by using a pair of RJ45 modules and putting a standard UTP cable in between. See the figure on the right. We tested them with cables up to 10m and they are still working fine.
The Intel NUC Developer Hub
The intel IoT Developer Hub is a software suite installed on the Intel NUC. It is the main access point for the IoT Gateway. It allows you firstly to administer your gateway, i.e. keep the OS up to date as well as install/update the different packages installed. Beware that updating the gateway takes some time. The out-of-the-box hardware configuration is rather constrained. It took us over 24 hours to successfully install the updates.
Note: We didn’t do a root cause analysis of the update problems, but the updating process hangs/crashes regularly. We had to leave the gateway portal page continually open in the web browser and refresh-and-restart periodically for the updating to succeed.
The most notable tool that comes pre-installed with the Gateway is a Node-RED. The Node-RED environment allows you to create and run your IoT workflows. Several nodes (building blocks) have been made available, through their UPM library, to interact with the different sensors in the kit. However, the set is very small which makes building alternative solutions on the gateway rather limited. A nice and clear tutorial on how to extend the library with your own nodes would be nice (maybe something to consider for another blog post 😉). Node-RED itself remains very nice though. We have used it in other setups as well. Be sure to check it out!
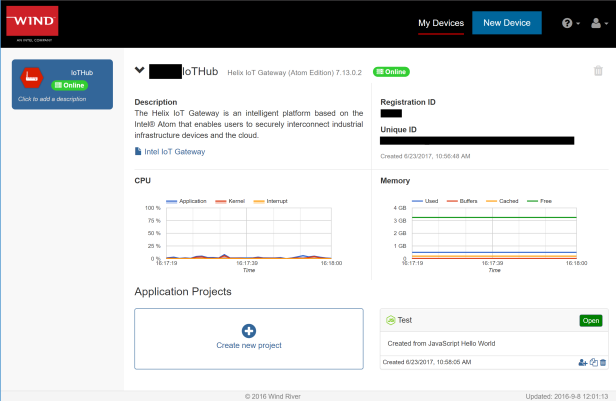
A second tool available to you, which is not explicitly mentioned in the Hands-on-Lab, is the ability to register your device (IoT Gateway) on the so-called Wind River Helix App Cloud (see figure below). Once registered, one can develop and deploy C/C++/JavaScript (Node.js) projects from the cloud onto the gateway.
This private cloud also houses a fully functional web-based development environment called “Cloud9”.
Connecting to the gateway using SSH
The following part of the Hands-on-Lab is about connecting to the gateway using a secure shell. However, we completely skipped this step as it was not needed to complete the rest of the lab. In case you do need some command line interaction with your gateway (which was mentioned at some points throughout the lab), you can always resort to the fully functional web based console. Just hit the launch button of the Cloud command web console from within the IoT Developer Hub’s administration section. Next, click the console button on the bottom right of the screen (>_~) and you are there.
Reading the temperature sensor
Finally, we can start to develop some IoT workflows. Having connected the different components as depicted in the first figure in the beginning of this post, we will now use the Node-RED environment to interact with the sensors/actuators.
The basic flow we will be creating is that of a upm-grove-temperature node to a function node to a upm-grove-rgb-lcd node. The first node will read the raw values from the temperature sensor. These raw values need to be converted to actual meaningful temperature values. This is the responsibility of the function node. Then, the values obtained are sent to the last node which is responsible for displaying them on the small LCD display. You can find (and import) the complete flow here. Launch the flow by clicking the Deploy button in the top right corner of the screen. If everything went well, you should see the current temperature on the LCD screen now.
Note: The be realistic, the temperature readings should go through another data conversion function to properly calibrate them. If you zoom in on the figure above, you can see the temperature in our room is said to be 39° Celsius while the actual temperature is about 25° Celsius. From observations, there seems to be a constant difference of about 15° Celsius. However, this could differ in your environment. Things to consider when dealing with real sensors.
Conclusion
OK, that’s enough for now. In this post, we gave you an overview of the Intel IoT Gateway and started developing our first IoT workflow, reading data from a temperature sensor. In the next post, we will start pushing these sensor readings to the cloud and start processing them.

Bram Pellens
Senior Researcher @ Spikes
![]()
![]()
