

As you may have read earlier on our blog, we recently started working with K2 Appit. An interesting blog post, which introduces K2 Appit in a very comprehensible way, can be found here.
In the next ten to fifteen minutes I will show you how to interact with the API.
In this example, the interaction occur from within a native windows desktop application.
At the end you will be able to view and execute workflow tasks created from your K2 workflow(s). I bet you don’t have much time, so let’s move on!
First of all, you will need the URL to your K2 Appit environment. Follow the steps below in order to easily retrieve this piece of information.
> Navigate to the site content page of your SharePoint site.
> Click the K2 Appit for SharePoint app.
> Under the Administration section, look for Registration Wizard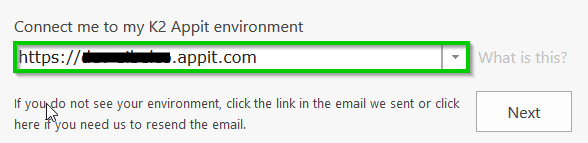
Besides, we also need the URL of your O365 tenant environment. Compared to the previous procedure, this URL is less hard to find. Just navigate to one of your SharePoint sites, and copy the URL from the address bar in your browser.
E.g.: https://my-domain.sharepoint.com
In the next step we will create an Azure Active Directory application which is needed for the authentication process.
Indeed, calling the K2 Appit API does require authentication! This means it’s safe and secure!
I will not go into full details on how to setup the AAD app, as it is very well explained on msdn.
Make sure however you register a native client application and not a web application.
If you didn’t encounter any problems so far, you should have obtained a similar configuration file in your project. Please keep in mind that there are 2 additional settings at the bottom of the configuration file. Since t hey are always the same, you can directly add them to the configuration file as well.
And now, finally, the moment you have been waiting for? Let’s dive into the code!
Make sure you have referenced the Microsoft.IdentityModel.Clients.ActiveDirectory nuget package. This reference contains the objects and methods needed to get you authenticated.
In order to make a call to the K2 Appit API, we first need an authentication token.
Below a HttpClient instance is built, which will contain a valid authentication token embedded in it’s headers.
From now on you can use this httpClient instance to go and call the K2 Appit API.
Retrieving tasks – called work list items in K2 – can be done as shown below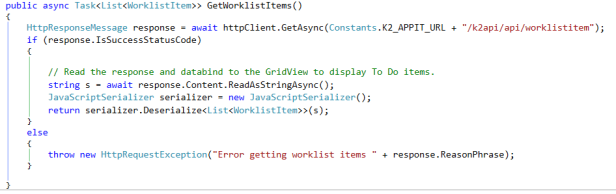
It is possible to execute your task(s) via this client application as well.
How this is done, including some additional information, can be found in the fully working sample project.
To round things up, I’d like to recommend a really nice – yet free! – tool.
It really make life easier if you’re frequently working with API calls and JSON strings.
It’s called Json2CSharp and it lets you convert any JSON string into a c# class. Who likes working with those damn JObjects anyway?

Thomas Gielissen
Cloud Solution Developer @ Spikes
![]()
![]()
