
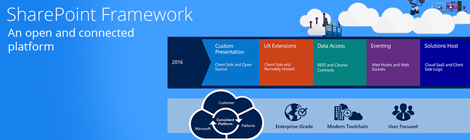
What is the SPFx?
A couple of months ago Microsoft announced the first public ‘developer preview‘ of the SharePoint Framework. But what is it exactly?
The SharePoint framework is a new page and web part model. With this initial release, you can start building client-side web parts using modern script development tools and the SharePoint Workbench (a new development test surface), and you can deploy your client-side web parts to classic web part pages in Office 365 Developer tenants.
One of the most popular web parts in SharePoint is the Scrip t Editor. You can use it to paste JavaScript in the web part that starts running when the page renders. The JavaScript runs in the same browser context as the page and the same DOM which allows it to interact with other controls on the page. However, there are a couple of downsides when using this approach. End users don’t have the ability to alter the configuration for the Script Editor web part and each user who can modify a page can view and edit the code which may break the web part. Luckily this new framework is here to help! Here are a couple of advantages when you choose to work with the SPFx:
- Client side web parts built on the SharePoint framework will run in the same context as the current user
- Web parts are rendered in the normal page DOM (so no IFrames!)
- Controls are responsive and accessible, allowing communication
- Provides the end user to change the web part configuration
- Custom code is safely stored in the background so there is no possibility that it gets altered when a user modifies a page.
I guess it’s safe to say that the SharePoint framework is the next (r)evolution in SharePoint development.
How to get started?
To start playing with the SharePoint framework an O365 tenant with the ‘First release’ option enabled is required. Also some additional developer tools need to be installed. You can take a look at Microsoft’s documentation:
Example: Building a company geographical webpart
I have chosen to build a web part using React. The attractive thing about using React for client side web parts is that the SharePoint framework itself is built using React. Therefore, React is already available for use and end users don’t need to load any additional frameworks first which translates in a faster loading time for the web part. An important part of each web part is the UX. The more it blends on the page the more it feels like part of the page. In order to do so we use Office UI Fabric.
How to provide configuration settings?
To provide come configuration options for the end user, we can make use of the propertyPaneSettings function in the BaseClientSideWebpart class. In our example the user can choose from where the results need to be fetched. Translated into code it looks something like this:
protected get propertyPaneSettings(): IPropertyPaneSettings {return { pages: [{ header: {description: 'Please select the list to fetch data from.' }, groups: [{ groupName: strings.BasicGroupName, groupFields: [this.dropdown ]} ]} ]}; }How to read data from SharePoint?
The web part context provides the use of a httpClient to send REST request towards the SharePoint online API. Due to the fact that the web part runs in the current user’s context we do not need to worry about authentication and a request can be done fairly easy. The SharePoint API runs asynchronous so we return a promise with our fetched results. When thinking about ‘separation of concerns’ I would suggest to work with some kind of ‘data provider’ who would be responsible to query the SharePoint API. When a rest call needs to be changed you can simple alter this class and all the web parts using the ‘data provider’ will get the update.
public readItems(): Promise<IcompanyItem[]> {const queryString: string = '?$select=Id,Title,address';return this.httpClient.get(this.listItemsUrl + queryString) .then((response: Response) => {return response.json(); }) .then((json: { value: IcompanyItem[] }) => {return json.value.map((companyItem: IcompanyItem) => { const returItem: IcompanyItem = { Id: companyItem.Id, Title: companyItem.Title, address: companyItem.address }; return returItem;}); }) .then((companyItems: IcompanyItem[]) => {return companyItems; }); }React building blocks
Components are the building blocks of React. If you’re coming from an Angular background, components are very similar to Directives. If you’re coming from a different background, they’re essentially widgets or modules. You can think of a component as a collection of HTML, CSS, JS, and some internal data specific to that component.
In our example I have created a ‘companyList’ building block. When the page starts rendering the component will trigger the render function. In the render function we simple return some plain HTML as well as our building block.
public render(): React.ReactElement<React.HTMLProps<HTMLDivElement>> {return this.props.selectedListItems.length > 0 ?(<div className={ styles.company }><div className={ styles.topRow }><h2 className={ styles.companyHeading }>{ 'Customer locations' }</h2>{ this.workingOnItSpinner }<CompanyList { ...this.props } items={ this.props.selectedListItems } /></div></div>): null; }When we hit the companyList element the browser will then execute the render function in the companyList building block class. FocusZone and DetailsList are just building blocks we get directly from the Office UI Fabric library.
public render(): React.ReactElement<IFocusZoneProps> { const imageProps: IImageProps = {src: this.getGoogleMap(this.props.items),width: 600,height: 500 };return ( <FocusZone direction={ FocusZoneDirection.vertical } isInnerZoneKeystroke={ (ev: React.KeyboardEvent) => ev.which === getRTLSafeKeyCode(KeyCodes.right) } ><DetailsList className={ styles.companyList } items={ this.props.items } onRenderItemColumn={ this.onRenderItemColumn } /><Image { ...imageProps as any } /> </FocusZone>); }The result looks something like this: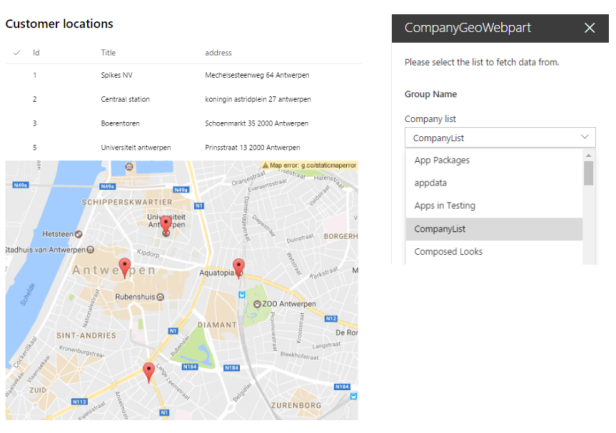
You can take a deeper look into the code by downloading it here. Please note that u will need to use the following command in order to install the required dependencies.
npm install
Next, a companyList custom list needs to be available on your O365 Tenant with at least a Title, Id and address field.
Happy coding!
–

Bart Leemans
O365 Developer @ Spikes
![]()
![]()
![]()
–
