
Introduction
Active Directory Federation Services (ADFS) is an identity provider for Windows. It provides a Security Token Service (STS) that creates and issues SAML tokens to authenticated users to a wide variety of applications.
Example: Single Sign On for Office 365 and other cloud based SaaS applications.

image source: https://blogs.office.com/2014/05/13/choosing-a-sign-in-model-for-office-365/
This article describes the preferred upgrade method from an ADFS 3.0 Farm to an ADFS 2016 Farm.
What is new?
ADFS 2016 has a number of new and improved features.
Security and Identity are hot topics these days. Companies are required to continuously improve the level of access security. New options for eliminating passwords and therefore provide a more secure authentication method a one of the key benefits in ADFS 2016.
- New Azure Multi Factor Authentication (MFA) adapter for AD FS. => authenticator app is available for all mobile platforms.
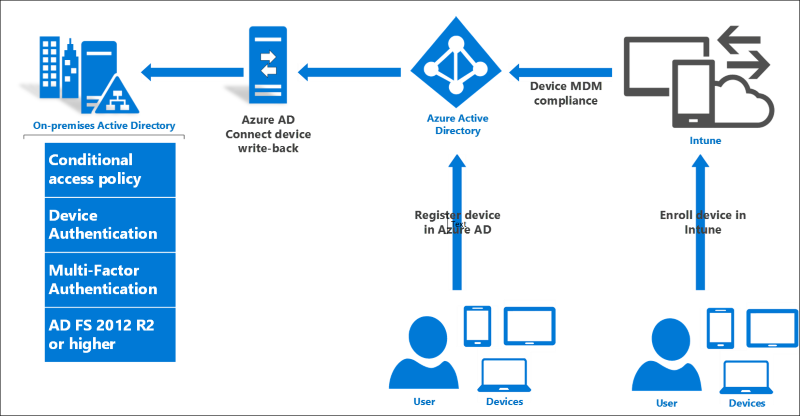
Azure MFA allows the user to use an Azure MFA code from the “Azure Authenticator app” for authentication. ADFS 2016 Azure MFA stores the information directly in Azure AD. The implementation has been simplified because the installation of an on-premise MFA server is no longer needed. - Hybrid conditional access and device policies.
AD FS 2016 conditional access policies can be used in combination with Azure AD. This hybrid setup uses an on-premise component to give you the capability to enforce the AD FS policies to your cloud enrolled devices. The Azure AD Connect service needs to be configured with the device write back option enabled. - ADFS Support for Windows Hello For Work. ( =>! Requires Azure AD)
Windows Hello, previously called Microsoft Passport for work, is a new feature, introduced with Windows 10 that has the ability to replace password authentication with a number of stronger authentication methods; like gestures, Pin code or face recognition.
Some other new features in ADFS include:
- The introduction of Access Control Policy Templates.
- Customized login pages for individual applications make it possible to provide a better corporate branding to end users.
- ADFS 2016 has the ability to send password expiration claims to applications. Example: Office 365 applications can now notify the user when their passwords are about to expire.
Additionally, the upgrade scenario from ADFS 3.0 to ADFS 2016 has been greatly improved, allowing you to add a new ADFS 2016 server to an existing ADFS 3.0 Farm. This eliminates the requirement of completely rebuilding your ADFS Farm.
Upgrade Scenario
We are starting from a Windows 2012R2 domain with two ADFS 3.0 servers and two WAP Servers. The general idea is to upgrade the ADFS 3.0 farm to Windows Server 2016 and ADFS 2016 FBL (Farm Behavior Level). It is the assumption in this scenario that the required certificates, used for ADFS, are already imported on the servers. Additionally network load balancing has also been enabled and configured in this setup.
Basic overview of the setup: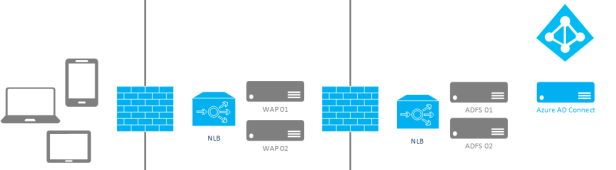
Step 1: Installation of the new ADFS 2016 Server
Deploy a new Windows Server 2016 Server in your environment. It’s recommended that the server will be dedicated to handle the ADFS Role only.
Once the new server is up and running, navigate to the Server Manager.
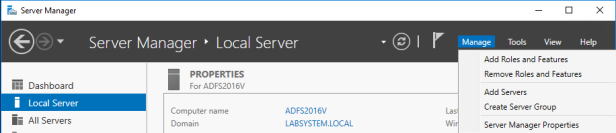
In the Server Manager, click on manage > Add Roles and Features


Check the checkbox next to Active Directory Federation Services and click on Next and complete the additional installation steps.
Step 2: Configuration of the new ADFS 2016 Server
In the server manager click on the yellow exclamation point and click on “Configure the federation services on this server”.

Click on “Add a federation server to a federation server farm” and click on next.

Make sure you run the configuration with an account that has global ADDS domain permissions and click next.

Specify the old 2012R2 server, in this case this is server “ADFS01V.

Select your certificate (please note the assumption in this procedure is that the certificate is already imported on the server).

Specify the ADFS service account that you use on the other ADFS servers.

Click configure to complete the configuration.


Step 3: Migrate ADFS 3.0 roles to the New Server
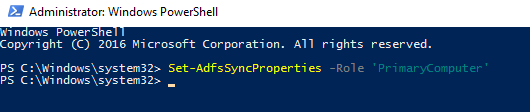
Set the new ADFS 2016 server as primary ADFS server:
Set-AdfsSyncProperties -Role ‘PrimaryComputer’
On the old primary ADFS 3.0 server run the following command:
Set-AdfsSyncProperties -PrimaryComputerName ‘newprimarycomputername’ -Role ‘SecondaryComputer’

On the other secondary ADFS 3.0 servers run the following command:
Set-AdfsSyncProperties -PrimaryComputerName ‘newprimarycomputername’

Check the FBL Level:
Get-AdfsFarmInformation | fl *

Step 4: What to do with the existing WAP servers?
Two options:
- Keep the existing WAP (Windows Server 2012R2) servers in place and use them in combination with the new ADFS 2016 Server(s). Because you are reusing the existing configuration there will be a minimum impact on your users experience and your IT environment.
- Install new Windows 2016 servers in your DMZ and deploy the Web Application Proxy service. This is a more complex approached that might require downtime depending on your environment.
Step 5: Upgrade to ADFS 2016 Farm Behavior Level
! Until this point the new ADFS 2016 has been running in 2012R2 ADFS 3.0 FBL mode. To enable the 2016 features of ADFS, you will need to raise the FBL of your new ADFS environment. Before continuing please make sure you decommission your old ADFS 3.0 servers. You can simply uninstall the ADFS role from these servers.
! Important: It is not supported to utilize a Windows Server 2016 FBL without first using the Windows Server 2016 Active Directory schema. You will need to run ADPrep using the Windows Server 2016 installation media on a Windows Server 2012R2 domain controller.
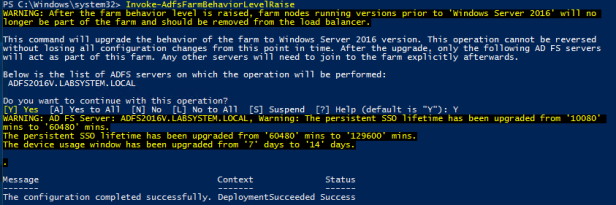
To raise the FBL to ADFS 2016 of your ADFS farm, run the following command from an elevated PowerShell prompt
Invoke-AdfsFarmBehaviorLevelRaise


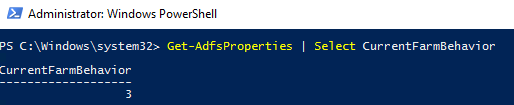
Step 6: Testing and validating upgrade
Get-AdfsProperties | Select CurrentFarmBehavior

Juan Stuyck
Hybrid Cloud Infrastructure Consultant @ Spikes
![]()
![]()
